I don’t listen to many audiobooks, but when I do, I often wish for a way to capture some quote or reference without having to manually transcribe it. Luckily, by using tools that do one thing well and that embrace automation and interoperability, I’ve achieved this. The apps involved are Highlighted, Overcast, and VoiceExpress. These are then tied together with Shortcuts.

Highlighted

I’ve used Highlighted for nearly three years, and over time, it has become a delightful record of the books I have read.

Overcast

I download my audiobooks in a DRM-free format, usually from Libro.fm, and then upload them to Overcast in order to take advantage of Smart Speed. (Uploads are a feature of the $10/year subscription, which I happily pay.)

VoiceExpress

It took a little bit of searching, but VoiceExpress is a simple app that uses iOS’s native transcription features to convert audio to text.

The Shortcut

The shortcut here is very simple. It accepts Media files via the Share Sheet, pipes it into the Transcribe Audio action from VoiceExpress and then passes the resulting text into the Highlight action. To use the shortcut, prepare a clip of an audiobook and share it to the shortcut. That’s it!

A screenshot of the shortcut

Caveats

The results are of course imperfect; they usually require some editing after the fact. It’s also possible that I will not accurately intuit the punctuation for complex sentences. I find these tradeoffs acceptable for the overall benefit.

The two biggest players for audiobooks are Audible and Libro.fm, but neither supports sharing clips. (Audible used to but the feature was removed.) I was already using Overcast for audiobooks anyway, but if I weren’t, the ability to capture highlights in this way would be enough to get me to start.

Photo of Sony-Ericsson T637
Recently, the Connected crew were discussing ideas for iOS 9 and describing putting iPhone into Do Not Disturb based on calendar events. On Nerds on Draft, Gabe and Jeff have talked about automation on iOS and on OS X. This got me thinking about my favorite phone of all time, the Sony Ericsson T637. This was my first real experience with tech automation. Combined with a single 3rd party app, this is the only phone that allowed me to feel like and appear as a wizard relative to what everyone else around me was doing.

Calendar-based Do Not Disturb

Screenshot of the user manual describing calendar-based profile switching.

When I was in graduate school, many of my professors were understandably strict about cell phones in class. This was still pretty early days for cell phone ubiquity, and many were still adapting. But, while I had the T637, my phone never rang during class. If the phone did ring and the professor lecturing, she either started early or went over her time. Because my phone supported this automatic profile switching based on my calendar, I appeared to be so on top of things that my phone never rang during class, and I got the immature satisfaction of a smug smile each time someone else‘s phone rang during class.

Ahoy, Telephone

Screenshot of the user manual describing how to configure the magic word feature

My T637 also supported an arbitrary magic word. Go into a quiet room, and record yourself saying, “Ahoy, telephone,” and flip a switch, and the phone would be always listening for you to say the magic word and leap to your service. This feature worked remarkably well, but as the warning says in the manual, it was an obvious drain on battery life. But, the T637 had a replaceable battery, and I carried a couple of spares.

Sync

When it comes to sync, the T637 was able to sync over Bluetooth with my iBook via iSync. I think iSync is one of the most underrated applications that Apple ever created. From Palm Pilots through the pre-iPhone days, iSync was solidly reliable for syncing my portable productivity devices. Perhaps this is mostly because I rarely added or changed data on the mobile devices, but I never had any syncing issues with iSync in the several years that I used it.

Games

My T637 had Snake and Mini Golf. That should be enough to entertain anyone for hours, but since my wife had the same phone, we could play two player Mini Golf! I had one particularly painful class that my graduate school required in order to make sure we knew how to use a library and computers, and it was taught by the single most boring human being to ever walk the planet. I chose a strategic seat near the hallway wall, and my wife would come sit on the other side of the wall and play Mini Golf with me over Bluetooth during the class because she’s the best.

Salling Clicker

Salling Clicker is possibly my favorite Mac + mobile combination of all time. It earned five mice and an Eddy from Macworld and two ADA’s in 2003. I initially purchased SC for my Sony T68i and it was a constant companion until the phone after the T637 was not able to run it because of dumb carrier firmware. Here are a few of my favorite features from my use:

  • Proximity Sync Thanks to the magic of Salling Clicker’s Bluetooth proximity features, my phone automatically triggered iSync when it came into range if it had been more than 1 minute since the last sync. This basically just moved over any calendar event or contacts changes, but it was important to always have this data handy and for my calendar to be up to date for the aforementioned profile switching.
  • Presentation Remote In graduate school, giving presentations was equivalent to giving a lecture to the class about the topic of your paper. While we had slide decks with bullet points on them, the really great presenters knew the material so well that they were able to walk about the room and really engage with the rest of the class. I wasn’t so ambitious as to know my paper that well (mostly because I hadn’t written most of it yet) but Salling Clicker allowed me to control Powerpoint and later Keynote from my phone and also display my presenter notes on my phone. The candy bar form factor of the T637 allowed me to discretely palm the device and advance slides even if I were several feet from my computer. I had lots of students and professors ask me how I was doing what I was doing. I explained it, but I don’t think any one of them ever pursued it.
  • Phone Calls Salling Clicker also allowed me to initiate phone calls from my Mac’s Address Book application. When I was on a phone call, SC would also mute my computer’s volume, pause iTunes, and update my iChat status to indicate that I was on a call.
  • iTunes Remote Well before Apple shipped infrared remotes with their Macs, Salling Clicker supported remote control of iTunes and other media applications. It also displayed current information from the application on the phone’s screen including album artwork, and it allowed browsing the iTunes library as well.

I’m not 100% sure why I’m feeling so nostalgic for this dumb candy bar phone with physical buttons and a terrible screen. I think mainly I’m longing for the gap that hadn’t yet closed between me and the muggles back in those days. I want to be a wizard again.

Tim Cook:

When I arrive in my office each morning, I’m greeted by framed photos of Dr. King and Robert F. Kennedy. I don’t pretend that writing this puts me in their league. All it does is allow me to look at those pictures and know that I’m doing my part, however small, to help others. We pave the sunlit path toward justice together, brick by brick. This is my brick.

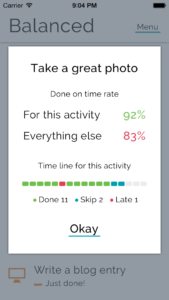
I’ve been trying to write for my blog more often. (I have an item in Balanced to help.) Part of this is making the actual writing process a pleasurable one. I write all my posts in Markdown before copying them over to Squarespace. I’ve tried Byword, iA, MultiMarkdown Editor and other writing apps. I’ve also tried keeping blog post drafts in nvAlt. For the longest time, nothing really clicked for me. Lately, though, I’ve been using Write and enjoying it quite a bit.

Overview

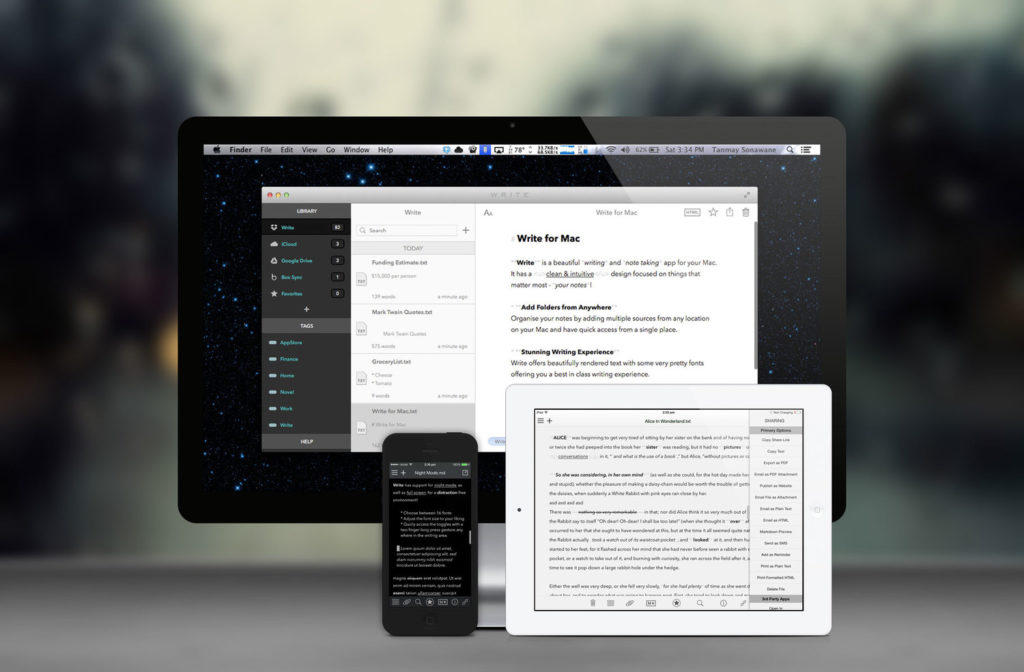
At its most basic, Write is a cross-platform Markdown-speaking text editor. Whether on the Mac, iPad, or iPhone, editing text is a consistent, straightforward experience. Each platform offers the same options for dark or light mode and writing in “rich Markdown”, hybrid mode, or plain text. Plain text is what it sounds like. There’s no formatting or styling of the text whatsoever.

The rich Markdown mode works much like any other word processor where the text displays just as it would print. Under the covers, the content is still Markdown, but it displays in rich text (headers, bold, italic, etc.) and responds to the usual rich text shortcuts like ⌘I for italics and ⌘B for bold on both Mac and iPad. (The iPhone app does not currently support keyboard shortcuts and is generally a bit buggy with a Bluetooth keyboard. The developer says he plans to address this in future development.)

The hybrid mode is what users of other apps like Byword will be most familiar with. It’s a formatted Markdown. The text displays with its formatting, but the formatting characters themselves are dimmed out. So, for bold text, **some text** displays “some text” in bold and the bolding asterisks in a subdued gray. On any platform, Write easily toggles between Markdown preview and editing with a tap or click.

Where most apps limit you to syncing to a single Dropbox or iCloud location, Write can sync multiple folders of documents and allows easy file navigation. Some users seem content to have all their files in one folder and then search for the relevant one, but for me, being able to keep my business text files in a separate Dropbox folder from my personal text files for ease of sharing and collaboration and general anal retentive organizational purposes. Write also supports iCloud syncing.

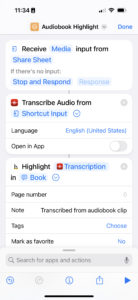
Another place that Write excels is in sharing and publishing capabilities. Write supports Tumblr, WordPress and FTP upload publishing. On iOS, Write also supports sharing to third-party apps and services like Facebook, CloudApp, Evernote, and Google Drive. If that’s not enough, it’s also possible to create your own sharing actions. The syntax for this is similar to creating custom actions in Drafts. If you’re familiar with Drafts, you’ll feel right at home here.

The last thing that all the Write apps support is tags. On iPad, iPhone, and Mac, Write can read and write tags that can be used in the other Write apps but also make their round trip to OS X’s native tags so that Spotlight search for regular OS X tags will also find your Write documents. If you’re a tagger, this is giant.

Write for iOS

Write icon

On iOS, the editing mode includes a helpful accessory view as well. In addition to formatting functions like bold, italic, underline, headings, lists, links, etc. there is a button for toggling Markdown preview, and utility buttons for undo/redo. The accessory button that I find most useful is the cursor positioning button. Tap on this button and keep your finger pressed to the screen and you can drag the cursor around the text view. The drag does not need to remain within the bounds of the button, and once you lift your finger from the screen, the cursor position is finalized. After just a few times using this feature, I found myself missing it in other iOS writing apps including Mail and Messages. My first laptop had a mouse pointer button in the middle of the home row rather than a trackpad, and this works similarly but at the same time much more responsively.

On the iPad, there is a familiar master-detail UI with a master view that collapses out of the way after selecting a file to view or edit. On the iPhone, the list of files is tucked away in a basement menu view that’s available with a tap. The key to Write’s iOS experience is that when you’re actually ready to write, the UI has already made itself scarce.

Write for Mac

Write for Mac is customizable to create any stylesheet you want beyond the included light and dark themes. Personally, I prefer my writing environment to be consistent on every screen, so I haven’t embraced any custom theming.

Write is similar to other Markdown apps. In my usage, it compares closest to Byword. Whereas Byword dims the text color of anything that is not your words, Write uses color for things like links in the body. These links are actually clickable, though, so it’s reasonable that they’re not dimmed.

Write for Mac uses the iPad version’s master-detail layout but makes good use of the extra space available on the Mac. The Mac version also allows for opening a document in a separate window, full screen mode, and other distraction-free writing hallmarks.

Conclusion

Write is a useful, consistent suite of apps that allows me to write any time the words decide to start flowing. With its plethora of output channels, including publishing to WordPress and Tumblr, Write can power any writing need.

Write is available for iPhone, iPad, and Mac.

It’s easy for me to cut myself too much slack. “You worked hard at work today. It’s totally fine to just zone out on the couch and watch Ancient Aliens for a few hours.” Some days, I don’t really feel like doing the things that are ostensibly important to me. It’s also very easy for me to let an activity I’m highly engaged in take up an outsized portion of my available time. This can be a healthy ebb and flow as long as I remember to give those other things attention before they’re starved and sometimes let those things take more than their fair share for a while.

One way to deal with this would be to plop tasks into OmniFocus and set defer and/or due dates, but that has two problems for me. The first is that some of these important things I do are not regular. I don’t need to go for a walk exactly every three days. And in fact, this wouldn’t even work because the days I can go for a walk are not regularly spaced. And I don’t want a defer date to bring up something I can’t actually do. I also don’t need a task like “Work on indie app” in my OmniFocus because it’s not a useful action.

More importantly, though, I don’t need these things in OmniFocus because that’s not the kind of stuff this is. OmniFocus is where I put the stuff that I have to do in order to keep the wheels from coming off. These important things aren’t tasks. They’re more like values. Call them priorities if you want. This is the important stuff that is often drowned out by the urgent. What I need is a gentle nudge to apply my time and attention in a way that will move me toward the life I want one step at a time.

Balanced icon

Recently, I discovered an app called Balanced. On the surface, it’s a fairly simple app. I have a list of stuff. Each item in the list has settings for how often I intend to do it. Then, Balanced handles the messy business of bubbling up the thing I should be doing right now to the top of the list. It does a great job of giving me just the right amount of prompting to keep me on the right track with the things that are important.

To create a new item in Balanced, just swipe down, similar to the pull-to-refresh mechanism in many apps. When creating a new item, there are just a few options First, there are the title and then the frequency settings. Then, you can select an icon to show next to it. Just a few taps and Balanced starts helping you give this new item the attention it deserves.

Configuring a habit in balanced

During this setup is when I do the thinking about how much of my life I intend to devote to this thing and how I want to balance it with the other items in the list. Taking health and fitness as one example, I have three items in my list: “Play ultimate”, “Go for a bike ride”, and “Go for a walk”. These have different frequencies. “Play ultimate” and “Go for a walk” are set to twice a week each. I don’t ride my bike as often as I play ultimate or go for a walk, so it is set to three times per month. This is a good balance for me among the things that I like to do with my health and fitness free time.

In the list of items, the thing Balanced thinks you should be doing next is always at the top. Right now, Balanced is reminding me to take the dog for her walk to the mailbox to check the mail, practice my tuba, and go for a bicycle ride. These three things are all doable today! Taking the dog to the mailbox is pretty simple. I have a bike ride scheduled with some friends this afternoon. I just need to go sit in my office for an hour with my tuba and work on some of the tricky passages in the music we’re playing for this first concert of the season and then I’ll have a pretty accomplished day! As I complete things, I swipe left-to-right to check them off. They fall to the bottom of the list waiting to bubble up again.

If, for some reason, I’m not going to do something that’s at the top of the list, I can swipe from right to left to skip it. This way, I don’t end up with a bunch of things that are “Past Due” staring me in the face and making me feel bad about my life. So, if “Go for a bike ride” says “Do now” but I’m still recuperating from a rough game of ultimate, I can skip it. If I’m super busy with work stuff and can’t go for a walk, I can skip it.

Balanced habit history

When I want to check in on a particular item, I just tap it in the list. Balanced shows me my success on the item and how it relates to my success on the other items in my list. It shows the title of the item, a balance score based on the number of times it has been completed on time, completed late, or skipped, and a timeline that shows a series of colored dots—green for done on time, red for late, and blue for skipped.

In the upgraded version ($2.99 in-app purchase), Balanced’s Life Pulse feature gives me a sense of how I’m doing with all the things I’ve put in. It will list the things to focus on more and also where I’m doing well. The Life Pulse graph provides a “balance line” indicating a 75% done on time rate. Life Pulse alone is worth the upgrade price. The other bits are nice (I like the disco mode theme and I have a passcode set.) but Life Pulse is the real value of the upgrade. Having a high level sense of how well I’m valuing things in my life is very helpful.

So, what kinds of things are in Balanced for me? Playing ultimate, playing music (tuba, guitar), practicing magic, going for a walk, and calling loved ones that it’s easy for me to go too long without talking to. I also have an entry to write on this blog and also to eat somewhere new. (I’m a creature of habit and it’s easy for me to get stuck in a rut.) I also have current side projects listed as well. It’s easy to let those slide for longer than I really want them to as busy days blur together into busy weeks.

I’m circumspect about adding too many things to Balanced for worry of either becoming overwhelmed or adding phony-baloney things that shouldn’t really be in here. Maybe I’ll relax this in the future, but for now, things that go into Balanced are precious to me and significantly contribute to the person I want to be. The important thing, though, is that Balanced can support anything you want to put into it. Want to drink enough water throughout the day? Balanced can help. Want to cultivate a perspective of thankfulness or empathy? Balanced can help with that too. Anything you want to have a little bit of help giving the attention you deem it deserves, Balanced can help.

Overall, I’m finding Balanced is just the right mix of reminders and information. I feel great about checking things off the list, and after a few weeks of using it, I feel great about the cocktail of important things it’s helped me create. If in the future I find I’m skipping things or I start to get overwhelmed, it’s simple to review the list and make adjustments to either the content or the ratios frequencies to keep myself living the life I want to live.

Screenshot of Launch Center Pro

Like Katie Floyd, I have had a lot of trouble integrating LaunchCenter Pro (also available for iPad) into my workflow. I’ve known about LCP’s power for a long time, but remembering to use it to tackle tasks was still a source of friction. Here’s how I’m learning to use LCP.

First, I identified the apps that I wanted to move to LCP. For me, this was apps like Tweetbot, Find My Friends, Reeder, and Pushpin. I put all these apps into a folder and named it LaunchCenter. (Including Pro elided the folder name.)

Next, I made this folder annoying to get to. I moved it off to the last screen of my iPhone where I relegate my folder of unused apps like Notes and Reminders. The goal with this is to make manually digging up the app I want to launch from LCP as painful as possible.

As an Alfred user, I’m also used to launching apps via the keyboard. With iOS 7 making Spotlight search available from any Springboard screen, this has become a frequent use for me. This is where the folder name comes into play. When I swipe my home screen down and type “twe”, I see Tweetbot. What I also see is the name of the folder where this app lives (LaunchCenter) and this reminds me that I mean to launch this app from there. So, I force myself to leave Spotlight and open Tweetbot from LCP.

The final piece of this puzzle is making LaunchCenter Pro itself easy to get to. For me, this meant just putting it into my dock. This is available on every home screen and seeing it all the time reminds me that I intend to use it more.

So far, I’ve worked adjusted my workflow for things like launching Podcasts and Reeder. Some apps I haven’t transitioned fully yet and I think these are mostly my most used apps (Tweetbot is always within a few apps in the switcher.) and apps I interact with primarily through notifications. But, I find myself launching LCP a lot more often and that’s really the first step to making it a habit.

Since the iCloud transition, my wife has been unable to receive event invitations from me or join my shared calendars and reminder lists. I’ve been increasingly fed up with the situation because it makes things I rely on like calendars and reminders inherently unreliable. Today, I believe I solved it, and given how many times I’ve seen this issue reported and lamented, I thought it would be helpful to write it up.

The other day I noticed that she had her iCloud @me.com address associated with her long-established Gmail-based Apple ID she uses for purchasing things from the iTunes Store. This was the first whiff of the problem’s scent I had had in a long time.

The issue seems to have been that somewhere along the way her @me.com address had been added as a secondary email address to the Gmail-based iTunes Store Apple ID. Removing the @me.com address from the Gmail Apple ID allowed things to flow properly.

This wasn’t enough for a nerd like me. I then set my mind to thinking about why this would be an issue. My best thought on this is that when the request comes in, Apple looks in the database for an account that has that email address associated with it. When it finds it, it checks if the account it’s associated with is an iCloud account. Since the Gmail account was older, it seems that this account was found first but then the system saw it was not an iCloud account and in the case of calendar and reminder list sharing, routed the invitation to email instead of the push notification system. Then, when she tried to log in via the web, the account that she logged into, the @me.com account, did not match the account that the request was associated with, the Gmail account, so joining failed.

This is all speculation, of course, given the not-even-NULL amount of familiarity I have with the database schema or any other workings of the iCloud infrastructure, but it makes sense—as much as ANY of this ordeal makes sense—and the scenario I’ve imagined is enough to satisfy my nerd need to explain things.

So, if you’re seeing similar symptoms, check any other Apple ID’s that your iCloud email address might be associated with and remove that association.

A while ago, something I can’t pinpoint happened where I abruptly stopped using an RSS reader. I actually started going back to the sites manually throughout the day to see what was new. Mostly, I think this has to do with just not to launch yet another app.

Lately, though, I’ve found myself following feeds I like in a different but very useful way—via Twitter. I made a list and have added the feeds I follow there. The majority of the sites I used to have in my RSS reader have Twitter accounts as well, and since I use Twitter regularly (via the awesome Tweetbot), this fits into my workflow quite easily. This won’t work for everyone including those that read a very high volume of feeds and can’t afford to miss an article, but for me, it’s been an effective, guilt-free way to pop in, see what’s going on, and pop out all on my own terms.

This also has the bonus effect of being a up-to-date repository of feeds I read so that when people ask me about the sites I like, I can just point them to this link. It’s not exhaustive because unfortunately, not all the sites I like have dedicated Twitter accounts, but it’s a pretty good start and I know that if I check this list a couple times per day, I’m up to speed on things and can go about my day.

When we moved to our new house, I needed to buy a new HD TV antenna. My previous approach wouldn’t work without drilling a new hole through the stone exterior of our new abode, so I began looking for an indoor option. Finally, I settled on the Leaf. There are two options: powered and basic. I purchased the powered version based on the combined reviews of both models.

The box arrived in our mailbox and seemed unimpressive. The box was ridiculously light and the body of the antenna is a thin, laminated sheet a touch larger than a standard 8 1/2” x 11” piece of paper. I began wondering what the return policy was. Undeterred, I screwed the Leaf coaxial cable into the TiVo and taped the unit to the wall. I scanned the airwaves for available channels and to my surprise, about thirty-seven were found.

Your mileage may vary. My setup consists of a Series 3 TiVo with a Western Digital 1TB DVR expander. According to antennaweb.org, our house in Benbrook is in a zone with all channels in blue zone or closer except for one.

I figured most of these would be unwatchable, but in my testing, I was able to view each channel clearly for several moments as I flipped. Most of these channels are things I don’t watch regularly such as hispanic and religious channels, but FOX, ABC, CBS, TXA-21, PBS, and CW, are all fully functional and so far reliable. NBC is flaky, but it was flaky with our previous antenna too. I will likely need to experiment with some alternate positioning.

Experiment with the wall positioning. Initially, I thought I’d put it as high on the wall as possible, but the sweet spot turned out to be about a third of the way from the top of the wall. You might want a helper to check the signal as you move the antenna around. Then, use something like these 3M command cable hooks to secure the cable. The cable needs to point straight down from the antenna body. The best I can ascertain is that the coaxial cable is actually a part of the antenna much like the iPhone 4 and 4S body serves as part of its antenna.

To my surprise, the Leaf from Mohu is a great HD antenna. It’s not as robust as the Terk we used previously, but it works great and prevented my having to drill a new hole in the exterior. The Leaf is a pleasantly surprising feat of engineering, and if you’re looking to cut the cord from cable or satellite, you should definitely give it a try.

A couple months ago, there were a few blog posts and toots about a little-known feature of 1Password: the 1Click bookmark.

If you’re also an OmniFocus user, here’s a next-level usage for 1Click bookmarks. Enter a task you’re to complete online that also requires a login. Drag that 1Click bookmark into the notes field like so:

Screenshot showing a 1Click bookmark in the OmniFocus notes field

(By default it will create a link with the title of the 1Password login, but I’ve pasted in the raw URL for illustration purposes.)

Now, when you’re ready to complete the task, the URL is there ready to automatically log you in, leaving you an extra 1.5s to savor another sip of that beverage you’re quaffing.